Intro
It's been a while since I did some coding - I've been playing more of a Business Consulting role, but sometimes still get to have some fun :)
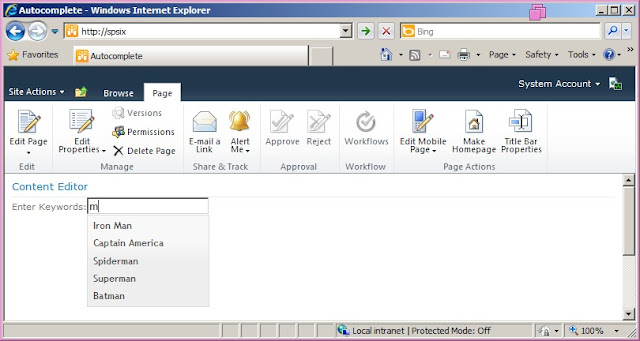
My favourite thing about jQuery, is the jQuery UI Toolkit. Amongst it is an Autocomplete menu control as described here - http://jqueryui.com/demos/autocomplete/. You can download the tool kit, and even style it using the themeroller.
The ingredients include:
1. Getting jQuery to run on a SharePoint Page/Custom Web Part
2. Getting the HTML and jQuery working
3. Getting the SharePoint Client Object Model (OM) working
4. Getting the jQuery Autocomplete to work together with the SP Client OM.
Benefits
Why should we use this approach? If you have a need for an autocomplete menu, and need it to be loaded on the fly whilst typing, then this may most likely be your solution!
Getting Started
To start, there are a couple of options:
A. Create a HTML file and save the code on this page into this file. Upload the file into the Site Assets library, and on any web part zone in SharePoint, add a Content Editor web part. In the web part properties, add a Content Link to this html file. I find this approach to be quickest whilst developing.
B. Directly place the HTML+jQuery code into a Content Editor web part using the "Edit HTML Source" option from the Ribbon (SP will tend to change your HTML for you in this option)
C. Write a custom web part to render this HTML+jQuery, including features that deploys delegate controls to register <link> lines to the jQuery library, etc. (Production quality)
1. Running JQuery on a SharePoint Page
I've tried to add jQuery on a SharePoint page so many times, however the jQuery just doesn't run at times. What do we do?
The trick is to have the JavaScript initiation code inside the following code block:
<script type="text/javascript">
JSRequest.EnsureSetup();
$(document).ready(function () {
ExecuteOrDelayUntilScriptLoaded(EntryPointFunction, "SP.js");
});
</script>
This block will allow any scripts (EntryPointFunction in the example above) to run after any SharePoint JavaScript.
2. JQuery AutoComplete Menu
This is an awesome control - The code required includes the
jQuery, and the HTML:
<script type="text/javascript">
$("#tags").autocomplete({ source: dataSourceArray });
</script>
<input type="text" id="tags" />
There are many options to setting up this autocomplete control, however it's all documented in the jQueryUI link above, so I'll skip through that.
3. SharePoint Client OM Script to query list data
And below, is the JQuery to get the SharePoint Client OM to query data from the list "Data". It returns the values from the "Title" field where the title contains "Test". Notice the CAML query on the line query.set_viewXml.
When the query values are returned from the call after ctx.executeQueryAsync, the getDataWithQuerySuccess function will run - this is where our fun starts.
There's a while loop which helps us build up an array of Titles. If you need multiple dimensions (which the autocomplete box will support), you can use this instead:
availableTags.push(
{
label: listEnumerator.get_current().get_item("Title"),
id: listEnumerator.get_current().get_item("ID")
});
But you will need to change the jQuery to handle this. Anyhow the Code will now look like this:
<script type="text/javascript">
JSRequest.EnsureSetup();
$(document).ready(function () {
ExecuteOrDelayUntilScriptLoaded(loadData, "SP.js");
});
function loadData() {
var selectedItems;
filterData();
}
function filterData() {
var ctx = new SP.ClientContext.get_current();
var lst = ctx.get_web().get_lists().getByTitle('Data');
var query = new SP.CamlQuery();
query.set_viewXml("<View><Query><Where><Contains><FieldRef Name='Title'/><Value Type='Text'>Test</Value></Contains></Where></Query></View>");
selectedItems = lst.getItems(query);
ctx.load(selectedItems);
ctx.executeQueryAsync(getDataWithQuerySuccess, getDatasWithQueryFailure);
}
function getDataWithQuerySuccess(sender, args) {
var availableTags = new Array();
var listEnumerator = selectedItems.getEnumerator();
while (listEnumerator.moveNext()) {
availableTags.push(listEnumerator.get_current().get_item("Title"));
}
}
function getDatasWithQueryFailure(sender, args) {
/*Error Logic here*/
}
</script>
4. JQuery AutoComplete Menu with SP Client OM Script
The last step is to combine the SP Client OM code with the jQuery AutoComplete Menu. I've included the whole piece with the styles, and script references as well below:
<link href="/_layouts/SPSix/css/ui-lightness/jquery-ui-1.8.20.custom.css" rel="stylesheet" />
<script src="/_layouts/SPSix/js/jquery-1.7.2.min.js"></script>
<script src="/_layouts/SPSix/js/jquery-ui-1.8.20.custom.min.js"></script>
<style type="text/css">
.inputwarning
{
border: 1px solid #F75D59;
padding: 2px;
}
.ui-autocomplete
{
max-height: 200px;
overflow-y: auto; /* prevent horizontal scrollbar */
overflow-x: hidden; /* add padding to account for vertical scrollbar */
padding-right: 20px;
}
/* IE 6 doesn't support max-height
* we use height instead, but this forces the menu to always be this tall
*/
* html .ui-autocomplete
{
height: 200px;
}
</style>
<script type="text/javascript">
JSRequest.EnsureSetup();
$(document).ready(function () {
ExecuteOrDelayUntilScriptLoaded(loadData, "SP.js");
});
function loadData() {
var selectedItems;
$('#tags').keyup(function (event) {
filterData();
});
}
function filterData() {
var ctx = new SP.ClientContext.get_current();
var lst = ctx.get_web().get_lists().getByTitle('Data');
var query = new SP.CamlQuery();
query.set_viewXml("<View><Query><Where><Contains><FieldRef Name='Title'/><Value Type='Text'>" + $('#tags').val() + "</Value></Contains></Where></Query></View>");
selectedItems = lst.getItems(query);
ctx.load(selectedItems);
ctx.executeQueryAsync(getDataWithQuerySuccess, getDatasWithQueryFailure);
}
function getDataWithQuerySuccess(sender, args) {
var availableTags = new Array();
var listEnumerator = selectedItems.getEnumerator();
while (listEnumerator.moveNext()) {
availableTags.push(listEnumerator.get_current().get_item("Title"));
}
$("#tags").autocomplete({ source: availableTags });
}
function getDatasWithQueryFailure(sender, args) {
/*Error Logic here*/
}
</script>
<span>Enter Keywords: </span><input type="text" id="tags" />
5. Now what?
What's next? Using the AutoComplete Menu Select event, you can add additional functionality when the user selects the autocomplete box. Some examples of how I've used this:
- As a replacement of default SharePoint drop downs that only support a begins with type ahead.
- As a filter for custom web parts that require special query strings or parameters.
- And more... Share your ideas with me below!
Basically the options are endless!
Have fun!


